Organic chemistry feels overwhelming when you’re staring at hundreds of reactions scattered across lecture notes, textbook chapters, and practice problems. You know the individual reactions, but connecting them into a coherent system seems impossible. That’s exactly where an organic chemistry reaction map becomes your most valuable study tool.
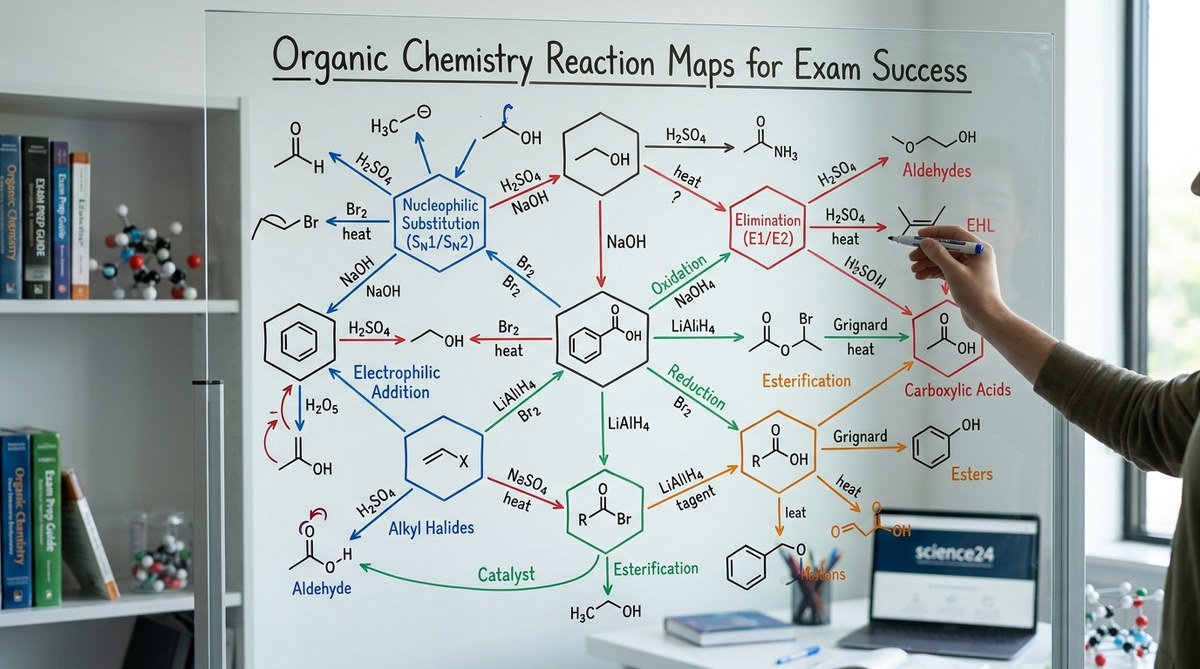
An organic chemistry reaction map visually organizes functional groups and their interconversions, showing how molecules transform through different reaction pathways. These maps help students see patterns, predict products, and recall mechanisms faster during exams by presenting chemistry as a connected network rather than isolated facts. Building and using these maps actively improves long-term retention and problem-solving speed.
What Makes Reaction Maps Different from Standard Notes
Traditional study methods treat each reaction as a separate event. You memorize that alcohols can form alkenes, that alkenes can form alcohols, and that aldehydes oxidize to carboxylic acids. But these facts remain disconnected.
A reaction map changes everything by showing relationships.
Think of it like a subway system. Each functional group is a station. Each reaction is a train line connecting stations. When you need to convert a ketone to an amine, you don’t just recall one reaction. You see the entire route: ketone to imine to amine. You spot alternative paths. You recognize where you might transfer lines.
The visual layout makes patterns obvious. All oxidation reactions flow in one direction. Reduction reactions flow the opposite way. Nucleophilic substitutions cluster together. Elimination reactions branch off predictably.
Your brain processes spatial information differently than text. When you picture the map during an exam, you can literally see where to go next. Students who master organic chemistry basics including functional groups find that reaction maps turn recognition into a systematic process.
Building Your First Reaction Map in Three Steps
Creating a personal reaction map forces active learning. Copying someone else’s map helps, but making your own cements understanding.
-
Start with core functional groups as anchor points. Place alkanes, alkenes, alkynes, alcohols, aldehydes, ketones, carboxylic acids, esters, amines, and amides on your page. Leave space between them. Use different colors for different oxidation states. Hydrocarbons in one color, oxygen-containing groups in another, nitrogen-containing groups in a third.
-
Draw arrows for major reaction types between groups. Connect alcohols to alkenes with an elimination arrow. Connect alkenes to alcohols with a hydration arrow. Add oxidation arrows from alcohols to aldehydes to carboxylic acids. Add reduction arrows going the opposite direction. Label each arrow with the reagent or catalyst needed.
-
Add mechanism notes and conditions directly on arrows. Write “H₂SO₄, heat” on the elimination arrow. Write “BH₃, then H₂O₂” on the hydroboration arrow. Include stereochemistry notes where relevant. Mark which reactions are stereospecific. Highlight reactions that create or destroy chiral centers.
The first version will be messy. That’s fine. Redraw it after each chapter. Each iteration reveals new connections you missed before.
Essential Functional Group Transformations to Map First
Not all reactions deserve equal space on your map. Focus on the transformations that appear repeatedly on exams.
Alcohol conversions
Alcohols sit at the center of most maps. They convert to alkenes through dehydration. They oxidize to aldehydes, ketones, or carboxylic acids depending on structure. They form ethers through substitution. They react with carboxylic acids to make esters.
Carbonyl chemistry
Aldehydes and ketones undergo nucleophilic addition. They form alcohols, imines, enamines, acetals, and cyanohydrins. They participate in aldol reactions. They reduce to alcohols or oxidize further.
Carboxylic acid derivatives
Carboxylic acids convert to acid chlorides, anhydrides, esters, and amides. Each derivative has different reactivity. The map shows this hierarchy clearly. Acid chlorides are most reactive, amides least reactive.
Aromatic substitutions
Benzene rings deserve their own section. Electrophilic aromatic substitution reactions add functional groups. The existing substituents direct new groups to specific positions. Your map should show activating groups, deactivating groups, and directing effects.
| Functional Group | Key Reactions to Map | Common Reagents |
|---|---|---|
| Alcohols | Dehydration, oxidation, substitution | H₂SO₄, PCC, SOCl₂ |
| Alkenes | Hydrogenation, hydration, halogenation | H₂/Pd, H₂O/H⁺, Br₂ |
| Aldehydes/Ketones | Reduction, nucleophilic addition | NaBH₄, Grignard, NH₂R |
| Carboxylic Acids | Esterification, reduction, conversion to derivatives | ROH/H⁺, LiAlH₄, SOCl₂ |
| Amines | Acylation, alkylation, diazotization | RCOCl, RX, NaNO₂/HCl |
How to Use Your Map During Active Study Sessions
Building the map is step one. Using it effectively requires deliberate practice.
Start with forward synthesis problems. Pick a starting material and a target molecule. Trace possible paths on your map. Write out each step. Check your answer. Adjust the map if you discover a pathway you forgot.
Then work backward. Given a target molecule, identify which functional groups you need. Work backward to simpler starting materials. Retrosynthesis becomes intuitive when you can see the entire network.
Practice spectroscopy integration. When given an NMR or IR spectrum, use the map to identify possible functional groups. Narrow down structures by considering which transformations could produce the observed peaks.
Time yourself. Set a timer for two minutes. Name as many ways to convert an alkene to an alcohol as possible using only your map. This builds the speed you need during timed exams, similar to how students develop efficiency through mental math practice.
Common Mistakes When Creating Reaction Maps
Students make predictable errors when building their first maps. Avoid these traps.
Overcrowding the page. Including every single reaction creates visual chaos. Focus on the reactions your professor emphasized. Add rare reactions only after mastering common ones.
Forgetting conditions. An arrow labeled “alcohol to alkene” is useless without conditions. E2 elimination requires a strong base. Acid-catalyzed dehydration needs heat. Conditions determine which pathway actually occurs.
Ignoring stereochemistry. Some reactions proceed with inversion. Others maintain configuration. Others create racemic mixtures. Mark this information clearly. Exam questions often hinge on stereochemical outcomes.
Separating mechanisms from the map. Don’t just memorize arrow pushing separately. Sketch abbreviated mechanisms directly on your map. Show the key intermediate. Indicate the rate-determining step.
Making it too pretty too soon. Your first map should be a working document. Use pencil. Erase and redraw. Add sticky notes. The polished version comes after you’ve tested it through multiple problem sets.
The best reaction maps evolve throughout the semester. Each practice exam reveals gaps. Each office hours session adds clarity. By finals week, your map becomes a personalized guide that reflects exactly how you think about organic chemistry.
Integrating Mechanisms with Your Visual Framework
Reaction maps show what happens. Mechanisms show how it happens. The combination is powerful.
For each major arrow on your map, you should know the mechanism. But you don’t need to memorize every electron movement separately. Mechanisms follow patterns.
Nucleophilic substitution reactions all involve a nucleophile attacking an electrophile. The details change, but the core concept remains constant. Your map should group these reactions together visually.
Elimination reactions all involve removing a leaving group and a proton. E1 and E2 differ in timing, but both create pi bonds. Position these reactions near each other on your map.
Carbonyl additions all start with a nucleophile attacking the carbonyl carbon. Whether you’re forming an alcohol, an imine, or a cyanohydrin, that first step is identical. Seeing this pattern reduces memorization dramatically.
When you understand mechanisms, you can predict outcomes even for unfamiliar reactions. You recognize the functional groups, identify the reactive sites, and apply the appropriate pattern. Understanding how atoms form bonds helps explain why certain mechanisms occur.
Adapting Your Map for Specific Exam Formats
Different exams require different map strategies.
For cumulative finals
Your map needs comprehensive coverage. Include reactions from the entire semester. Use color coding by chapter or topic. Create a master map, then smaller specialized maps for complex topics like carbonyl chemistry or aromatic substitutions.
For MCAT preparation
Focus on reactions relevant to biochemistry. Emphasize ester and amide chemistry since these appear in proteins and lipids. Include reactions of amino acids and sugars. Add biological examples to each pathway. The MCAT rewards practice test strategies combined with solid content knowledge.
For ACS standardized exams
These tests cover breadth more than depth. Your map should include more reactions with less mechanistic detail. Focus on recognizing reagents and predicting products. Practice identifying reaction types from given conditions.
For synthesis-heavy courses
Expand the retrosynthesis sections of your map. Add disconnection strategies. Mark which reactions form carbon-carbon bonds. Highlight protecting group strategies. Include common multi-step sequences.
Digital vs. Hand-Drawn Maps for Different Learning Styles
Both formats have advantages. Choose based on how you learn best.
Hand-drawn maps force you to think through each connection. The physical act of drawing reinforces memory. You can sketch them during lectures, add notes in margins, and carry them anywhere. They work perfectly during power outages or when screens cause eye strain.
Digital maps offer flexibility. You can rearrange elements easily. You can use different layers for different reaction types. You can zoom in on complex sections. You can share them with study groups instantly. Software like ChemDraw or even PowerPoint works well.
Many students use both. They hand-draw initial versions during learning, then create polished digital versions for review. The hand-drawn version builds understanding. The digital version serves as a reference.
Some students photograph their hand-drawn maps and annotate them digitally. This combines the benefits of both approaches.
Connecting Reaction Maps to Problem-Solving Speed
The real test comes during exams when time pressure mounts.
Students without reaction maps approach each problem independently. They recall individual reactions through brute force. This works for simple problems but fails for multi-step syntheses.
Students with well-developed maps think differently. They recognize patterns instantly. They see which functional groups connect directly and which require intermediate steps. They eliminate impossible pathways immediately.
Consider a synthesis problem: convert benzene to phenylacetic acid. Without a map, you might struggle to remember the steps. With a map, you trace the path visually. Benzene to toluene (Friedel-Crafts alkylation). Toluene to benzoic acid (oxidation). Wait, that gives the wrong product. Go back. Benzene to bromobenzene. Bromobenzene to phenylmagnesium bromide. Grignard addition to CO₂. There’s the path.
The map doesn’t give you the answer. It helps you think through possibilities systematically. It prevents you from missing obvious routes. It reminds you of reagents you might forget under pressure.
Students consistently report that reaction maps cut their problem-solving time by 30 to 50 percent. That’s the difference between finishing an exam confidently and leaving questions blank.
Study Group Strategies Using Reaction Maps
Collaborative learning amplifies the benefits of reaction maps.
Each group member creates their own map independently. Then compare them. You’ll discover reactions others included that you forgot. You’ll see different organizational schemes. You’ll debate which layout makes more sense.
Play reaction games. One person names a starting material and target. Others race to propose syntheses using only their maps. Discuss why certain routes work better than others.
Create challenge problems for each other. Write a target molecule. Others must propose three different synthetic routes. The map makes this exercise manageable rather than overwhelming.
Quiz each other on mechanisms. Point to an arrow on the map. The other person must explain the mechanism, including all intermediates and electron movements. This reveals gaps in understanding.
Build a master map together on a whiteboard. Each person adds their strongest section. The collaborative version often becomes better than any individual map. Take photos for everyone to reference later.
Reviewing Reaction Maps the Week Before Exams
The final week requires a different approach than earlier studying.
Don’t create new maps now. Review and refine existing ones. Add any reactions from the last lectures. Highlight the reactions your professor emphasized most. Mark reactions that appeared on practice exams.
Test yourself without looking. Draw the map from memory. Check against your original. Note which sections you forgot. Those are your weak points. Drill those specific reactions.
Walk through the map out loud. Explain each transformation as if teaching someone else. This reveals gaps in your understanding. If you can’t explain it clearly, you don’t know it well enough.
Focus on the reactions that connect multiple functional groups. These appear most often on synthesis problems. Practice going both forward and backward through these pathways.
Review common mistakes using your map. Where do students typically use the wrong reagent? Where do stereochemistry issues arise? Where do side reactions occur? Mark these danger zones clearly. Understanding common chemistry mistakes helps you avoid them.
Create condensed versions. Make a one-page summary map with just the most critical reactions. Bring this to the exam if allowed. Even if not, the process of condensing reinforces memory.
Beyond Memorization to Chemical Intuition
The ultimate goal isn’t memorizing your reaction map. It’s developing chemical intuition.
After working with your map for weeks, patterns become automatic. You stop thinking “what reaction converts alcohols to alkenes?” and start thinking “this molecule needs to lose water.” You recognize functional groups instantly. You predict reactivity without conscious effort.
This intuition serves you beyond organic chemistry. It helps in biochemistry when studying metabolic pathways. It helps in medicinal chemistry when considering drug modifications. It helps in research when designing new syntheses.
The map becomes internalized. You stop needing to reference it. The visual organization remains in your mind. During exams, you can picture the map and trace pathways mentally.
This level of mastery takes time. It requires consistent practice. It demands active engagement with the material. But students who reach this point find organic chemistry transforms from a memorization nightmare to a logical puzzle.
The reactions make sense. The mechanisms follow predictable patterns. The entire field becomes navigable.
Your Visual Guide to Synthesis Success
Walking into your organic chemistry final with a well-developed reaction map changes everything. You’re not relying on scattered memories or hoping the right reaction comes to mind. You have a systematic framework that organizes the entire semester into one coherent picture.
Start building your map today, even if exams are months away. Add to it after each lecture. Test it on every problem set. Refine it based on what works and what doesn’t. By exam day, you’ll have created a personalized study tool that matches exactly how your brain organizes chemical information. That map, combined with solid practice and understanding, turns organic chemistry from an overwhelming challenge into a subject you can genuinely master.